Coating Machine Tips

Uneven Emulsion Coating In The Corner Of The Screen

Prepress Coating Machine Lower Clamp Bar Mounts

You can visually see if there is a thicker deposit of emulsion in the corner of the screen by noticing the darker color. First, it is important to establish if the problem is consistent and happens on every screen or if the problem is random. If the problem is random, then quite possibly there is an issue with that specific screen. See future blogs for problems related to improperly stretching screens and warped frames.

Sources of heavy deposit in the corner of a screen

Generally, there are two sources that could create a heavy deposit in the corner of a screen. Either excessively soft screen tension in the effected corner/s or the coating machine is out of calibration. To check screens for proper screen tension, use a tension gauge and measure the tension level in all four corners and also in the middle of the screen. Ideally, the tension deviation should be no more than 1-2 N/cm^2 throughout. If a corner is more than 4-5 N/cm^2 different from the others measurements, the mesh will behave much differently there than in the rest of the screen and could very well produce thick emulsion deposits in that area. A tension gauge is a relatively inexpensive Quality Control device that can make a world of difference in your end product. Look for future blogs to address tensioning issues.

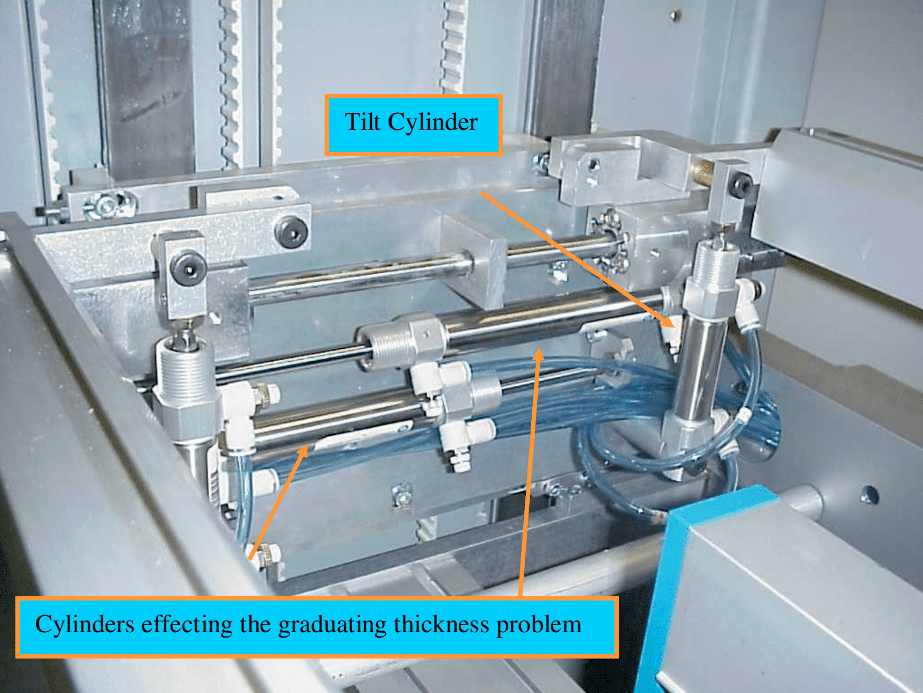
If the screen tension is good, and the problem is consistent from screen to screen, then we need to look at the coating machine itself. The frames are held in the coating machine by using clamping blocks to hold it securely in place. First check that the clamping blocks are locked down in their respective positions. Most clamping blocks have a degree of play when not secured properly. Also inspect each of the clamps, particularly the bottom clamps, for any emulsion that would prevent the frame from sitting properly in the machine.

Frame position is critical

Next we need to make sure the frame is properly positioned in each of its corners during the coating process. Each clamping block has a frame pin that the screen frame sits against. If one of the frame pins in not in its proper location (out of calibration) the frame will behave like a table with a short leg and rock during the coating process.

Checking frame pins is easy

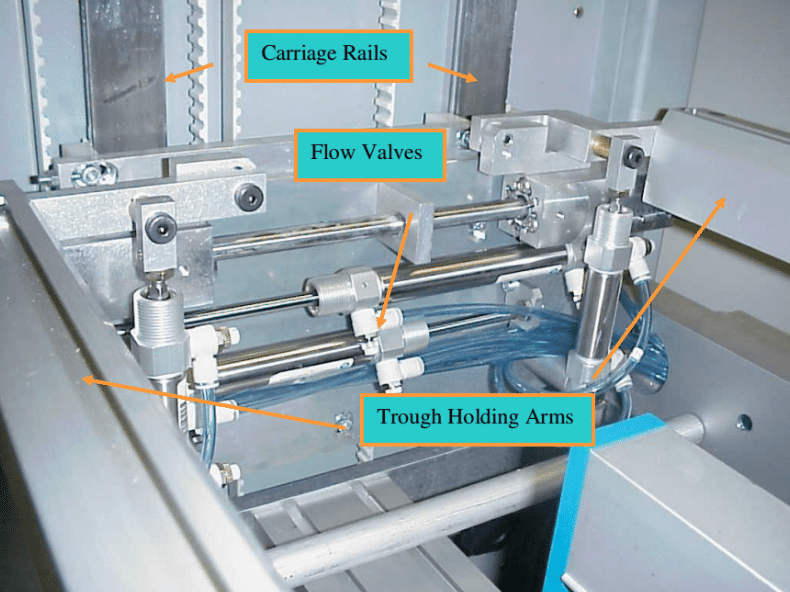
Easiest method to check each of the frame pins is a two part process. Using the machines manual function, maneuver the coating carriage so it is level with the bottom clamps and measure from the trough holding arm to the each of the bottom frame pins. Then manually position the coating carriage so it is level with the upper clamps and take the same measurements. All four measurements should be no more than 1/2mm different from each other.

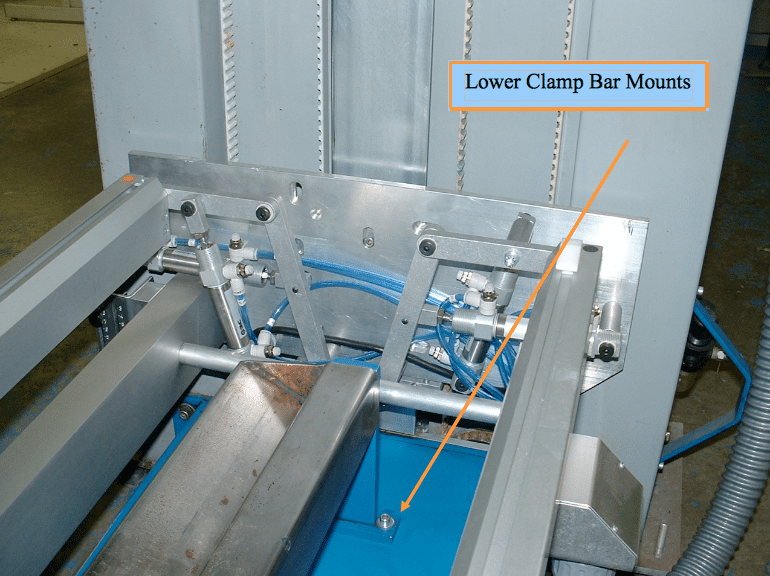
If an adjustment needs to be made, loosen the lower clamp bar mounts, move it into alignment with the upper clamps and tighten. Repeat the measuring process to ensure the proper adjustment has been made. As always, feel free to contact me with any questions.

Uneven Emulsion Coating Along an Entire Side of The Screen

Uneven Emulsion Coating Entire Side of The Screen

Over time the coating machine’s carriage mechanisms, responsible for bring in the coating troughs into the screen, will fall out of calibration and need adjustment. Usually, the tell tale sign is a heavy deposit of emulsion along one side of the screen from the bottom to the top. There are generally two versions of the problem. First is a heavy deposit getting progressively worse towards the side of the screen. In most cases the effected area is 5%-35% the width of the emulsion area (graduating thickness). The other scenario is a thick bead of emulsion only along the very edge of the coating area.

Problem: graduating thickness

When the heavy deposit effects more than just the edge of the coating area, it usually indicates a problem with the position (calibration) of one or both of the coating troughs relative to the screen. Each coating trough, both the front and the back, should push through the screen evenly approximately 1-3mm depending on the width of the screen and proximity to the inside edge of the screen frame.

In order to determine which side, front or back, is causing the problem, look at the outer most affected side. Knowing the front coating trough is the wider of the two, if the affected area goes all the way to the outside edge, then the problem is with the front coating trough. If the effected area stops 1/4″ from the affected side the problem will be with the back coating trough.

How to correct

Once the problem has been isolated, the solution is to simply bring the problem side in more towards the screen. The shaft on each of the pneumatic cylinders is threaded at the end and screws into an aluminum positioning block. Loosen the 13mm locking nut and use a 7mm open end wrench to turn the flats on the shaft in the correct direction. Keep in mind, a little goes a long way. Usually 1 full turn is enough. Tighten the 13mm locking nut and give it a try.

Problem: thick bead at the outside edge

Less commonly seen is a thick bead of emulsion a the far outside edge of the coating area. This is usually an indication the tilt cylinders need an adjustment. If the tilt cylinder under or over rotates the coating troughs there is not proper contact between the coating trough end cap and the mesh plain. The result is a gap that allows emulsion to flow through.

How to correct

The procedure for correcting this is virtually the same as correcting the graduating thickness. First determine if the affected edge is on the front or the back. If the thick bead is all the way to the outside, it’s the front trough. If the bead is 1/4″ to the inside of the coating area, it’s the back trough. Then determine if the affected side is over rotated or under rotated. Put an uncoated screen and empty coating trough (on the affected front or back side) in the machine. Raise the coating carriage approximately half way up the screen. Using the machines manual functions, bring the trough in, tilt it and visually inspect to assess whether it’s over or under rotated.

Loosen the 13mm locking nut and use a 7mm open end wrench to turn the affected cylinder shaft in the correct direction. Again, a little goes a long way. Start by turning it 1 revolution. Tighten the locking nut and try a new screen with emulsion.

If you have a question, please post it in the comments below. If you need immediate support, get in touch.

Coating Machine and Coating Trough Maintenance Tips

Coating Machine Maintenance

Proper maintenance of a coating machine (and troughs for that matter) is a fairly simple and not a very time-consuming task in the grand scheme of things. Obvious, but not always followed, if it’s dirty, clean it. If it moves, grease it. If it leaks air, stop the leak.

Poor edge quality (knicks)

With coating troughs, poor edge quality (knicks) will leave vertical lines up the screen and will certainly show up in the print. Over time from handling, small knicks will appear on the edges. Buffing with a product like a Scotch Brite pad found in your local supermarket can often significantly reduce the imperfections and reduce the effects on the screen. I don’t recommend any kind of sandpaper because it’s generally too coarse and will cause more problems than it solves. If the knicks are too severe to be corrected with the Scotch Brite pad, you should consider replacing them.

Dried emulsion

Dried emulsion on the coating trough edges during the coating process will also certainly cause lines or streaking. During the coating process, every screen or couple of screens, wipe the edges with a damp (not wet) cloth to remove the excess emulsion underneath the lip of the trough. Don’t use a “wet” cloth because the excess water will find it’s way into the trough/emulsion and cause a whole new set of issues.

Machine cleanliness

Quite often a spill will result in emulsion getting into the mechanics of the lower frame clamps. It is far easier to spray water on the affected parts and wipe with a rag off the base plate then it is to take the clamps apart later and clear the dried emulsion. The emulsion can also find its way onto the carriage and carriage mechanics. Emulsion on the carriage, or more specifically, the trough holding arm can cause the troughs to not sit correctly and thus affect the overall coating results. Emulsion in the carriage mechanics can cause problems with parts not moving as accurately as they should, also affecting results.

Grease moving parts

It is crucial to grease the rail that the carriage rides on. If the carriage rail has not been properly maintained (greased) the carriage will tend to “chatter” as it travels upward leaving horizontal lines in the screen every 1/4″ or so. It is not necessary to grease the entire surface of the rail, just the surfaces that comes in contact with the carriage guides.

First wipe the rails clean (WD40 works very well). Then reapply a layer of grease where the guides contact the rail. I recommend white lithium. Then use the same clean and reapply technique to the cylinder shafts of the carriage, but wipe clean with a dry rag. WD40 is not good for the cylinder seals.

On older machines that use a chain to pull the carriage, clean and grease them as well (don’t forget the drive chain inside the control cabinet). Also on the older machines that use bearings to guide the carriage instead of the Delron guides, a little lightweight oil in the bearings is a good idea. Once everything is lubricated, cycle the machine a few times to work it in.

Air leaks

Leaking air can affect the precision of the emulsion application (inconsistent pressure). Whether air is leaking from the cylinders, the flow valves on the cylinders, or the quick connect fittings anywhere on the machine, it should be addressed. Leaking air also puts an extra, unnecessary strain on the air compressor. Defective air components are relatively cheap and easy to replace.

If you have a question, please post it in the comments below. If you need immediate support, get in touch.